You will build
A portal for ACME's trade clients: members-only pages, a menu link only they see, and an admin that shows them their own notes and profile - nothing else.
You need
- A site you administer
- A second email address to test with
- A private browser window
The pieces
A role says what someone may do. Visibility says what they may see on the site. The Admin area setting keeps them to the screens you choose.
Step 1: Create the role
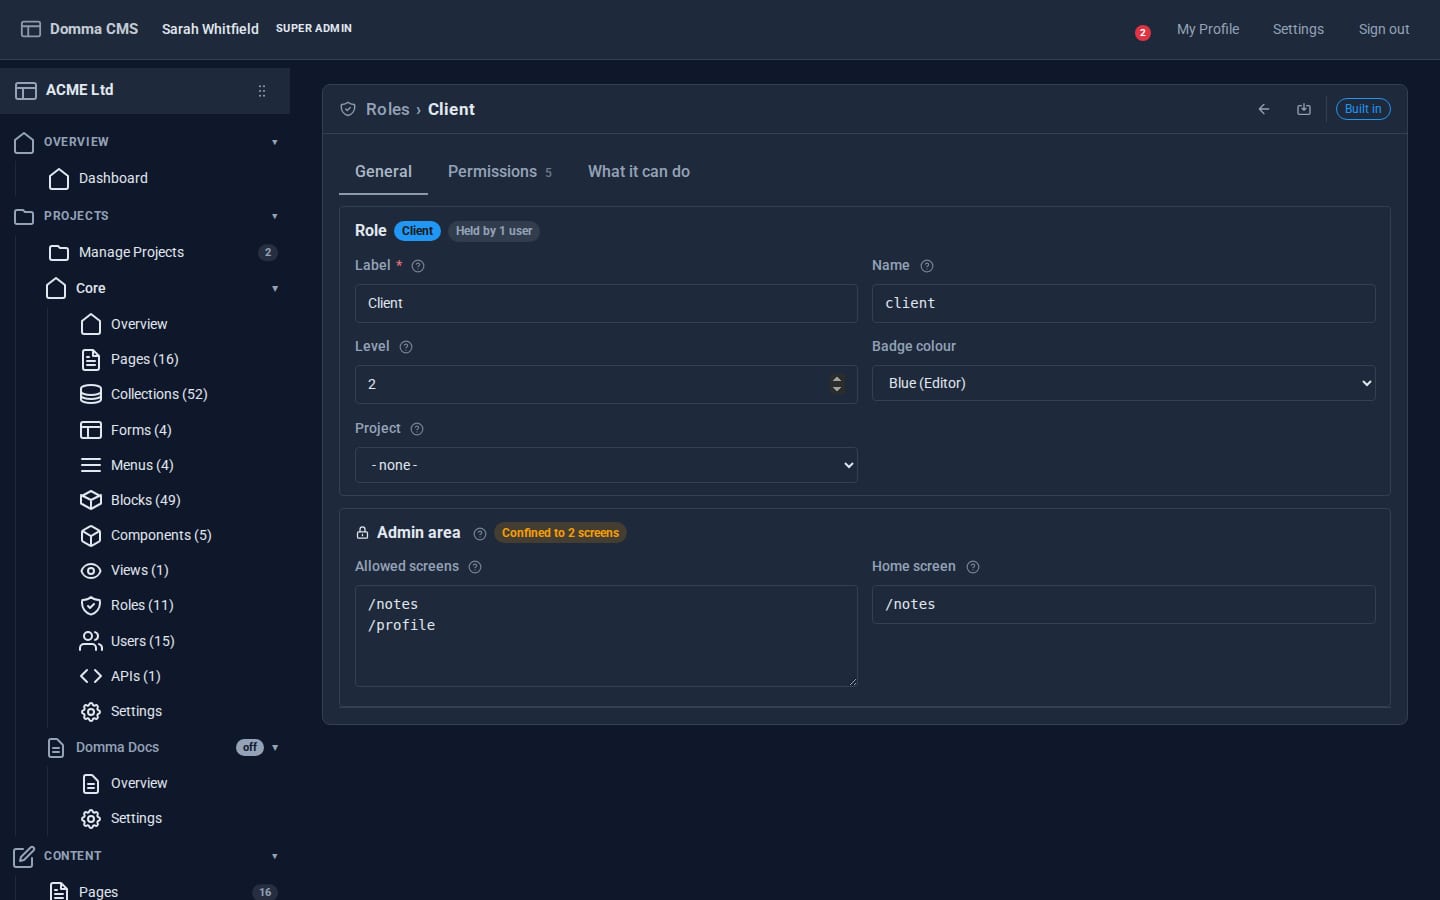
Go to System > Roles and click the + (New role) button. Give it the Label Client (the name client is made from it) and open it.
On the General tab set the Level. Levels decide seniority: 0 is the Super Admin, 1 is Admin, 2 is an ordinary user. A client belongs at 2 - never more senior than your staff.
Step 2: Choose what it may do
Open the Permissions tab. Permissions are grouped by area - content, structure, data, configuration and the Tools. Click an action to grant it, or Full for a whole area. For the portal, grant Notes only.
The What it can do tab reads the ticks back to you in plain words - a good check before you save.
Step 3: Confine it to its own screens
Back on General, find Admin area:
- Allowed screens - one admin route per line. Enter
/notes. A route also allows everything under it. - Home screen - where clients land after signing in, and where they are sent if they try to go anywhere else. Enter
/notes.
My Profile is always open, so clients can change their name, email and password. Save the role.
A user is confined only if every role they hold is confined, and the Super Admin never is. The server enforces the same limits on the API, not just the sidebar.
Step 4: Add a client
Go to System > Users and click + (New user). Enter a name, email and password, set the Role to Client and save. Everything is created in one step, so a mistake never leaves a half-made account.
From the same screen you can later send them a password reset email, copy a reset link to hand over yourself, or make the account inactive.
Step 5: Make members-only pages
Create a page at /clients/price-list. On Page Details, set Visibility to Client and above.
- Client and above means clients and everyone more senior - your admins can still check the page.
- Client only (listed under Role only) means holders of that exact role, plus the Super Admin.
Anyone else who tries the address gets a 403 page. Gated pages are cached separately for each set of roles, so a members-only page can never be served to an anonymous visitor by mistake, and site search only lists pages the searcher could open.
Step 6: A menu link only clients see
In Content > Menus, open the navbar menu, Add item with Label Trade prices and URL /clients/price-list, and set its Visibility to Client and above. Save. The link is filtered on the server for each visitor, so the public never even sees it in the page source.
Step 7: Sign in as your client
Open a private window, go to /admin and sign in with the client's details. They land on Notes, the sidebar shows only what they may use, and any other admin address sends them back home. Browse the public site in the same window and Trade prices is in the menu.
What you built
A secure client area with no extra Tool and no code: a role with only the rights it needs, an admin that shows clients their own tools and nothing else, members-only pages and a menu that changes with who is looking.
Keep going
- Locking down sign-in - lockouts and password rules for every account
- Two-factor sign-in with Security Pro
- Reporting with Saved Views - "show each user only their own results"
Try it on your own site
Everything in this tutorial is free. One command gets you a site to follow along on.